1.6 First Autonomous Mission
What You'll Learn
Execute your first complete autonomous drone mission:
- Understand waypoint mission structure
- Create mission file in proper format
- Load mission into SITL
- Execute AUTO mode flight
- Monitor mission progress
- Analyze flight logs
- Complete Phase 1 successfully
Time: 60-90 minutes
Prerequisites
Before starting, you must have completed:
- ✅ 1.1 Prerequisites and Setup
- ✅ 1.2 Environment Setup
- ✅ 1.3 ArduPilot SITL Installation
- ✅ 1.4 MAVProxy Command Line
- ✅ 1.5 Gazebo Simulation
- ✅ Can fly drone in Gazebo successfully
What is a Mission?
Mission = Pre-planned list of commands the drone executes autonomously
Mission commands include:
- Takeoff to altitude
- Fly to waypoint (latitude, longitude, altitude)
- Perform action (take photo, wait, change speed)
- Return to launch
- Land
AUTO mode: Flight mode that executes loaded mission automatically.
Why missions matter:
- Real-world applications (surveying, delivery, inspection)
- Repeatable flights
- Complex patterns without manual control
- Foundation for advanced autonomy
Mission File Format
QGroundControl Waypoint Format
ArduPilot uses QGC WPL 110 format (QGroundControl Waypoint List).
File structure:
QGC WPL 110
0  1  0  16  0  0  0  0  LAT  LON  ALT  1
1  0  3  22  0.00  0.00  0.00  0.00  0.0  0.0  10.0  1
2  0  3  16  0.00  0.00  0.00  0.00  -35.36  149.16  20.0  1
3  0  3  16  0.00  0.00  0.00  0.00  -35.37  149.17  20.0  1
4  0  3  16  0.00  0.00  0.00  0.00  -35.36  149.17  20.0  1
5  0  3  21  0.00  0.00  0.00  0.00  0.0  0.0  0.0  1
Header line: QGC WPL 110
Each line (waypoint) has 12 columns:
| Column | Name | Description | Example |
|---|---|---|---|
| 1 | Index | Waypoint number | 0, 1, 2, 3... |
| 2 | Current | Home position (1) or waypoint (0) | 1 for home, 0 for others |
| 3 | Frame | Coordinate system (3 = relative altitude) | 3 |
| 4 | Command | MAVLink command ID | 16=WAYPOINT, 22=TAKEOFF, 21=RTL |
| 5-8 | Params | Command-specific parameters | Usually 0 |
| 9 | Latitude | Latitude in decimal degrees | -35.363261 |
| 10 | Longitude | Longitude in decimal degrees | 149.165237 |
| 11 | Altitude | Altitude in meters (relative to home) | 10.0, 20.0 |
| 12 | Autocontinue | Auto-continue to next waypoint (1=yes) | 1 |
Common MAVLink Commands
| Command ID | Name | Purpose |
|---|---|---|
| 16 | NAV_WAYPOINT | Fly to waypoint and hold |
| 22 | NAV_TAKEOFF | Takeoff to altitude |
| 20 | NAV_LAND | Land at location |
| 21 | NAV_RETURN_TO_LAUNCH | Return and land at home |
| 93 | NAV_DELAY | Wait at waypoint (seconds) |
Full list: https://mavlink.io/en/messages/common.html
Create Your First Mission
Mission Plan
Let's create a simple square pattern:
- Takeoff to 10m
- Fly North 30m at 20m altitude
- Fly East 30m at 20m altitude
- Fly South 30m (back toward start) at 20m altitude
- Fly West 30m (return to start position) at 20m altitude
- Return to Launch (RTL at 15m, then land)
Flight path:
Start/Land
    ↓
    1 (Takeoff 10m)
    ↓
    2 (North 30m, alt 20m)
    ↓
    3 (East 30m, alt 20m)
    ↓
    4 (South 30m, alt 20m)
    ↓
    5 (West 30m, alt 20m)
    ↓
    6 (RTL - Return home)

Create Mission File
The missions directory was created in Section 1.2. Create the mission file:

Mission File Content
Paste this exactly:
QGC WPL 110
0   1   0   16  0   0   0   0   -35.363261  149.165237  584 1
1   0   3   22  0.00000000  0.00000000  0.00000000  0.00000000  0.00000000  0.00000000  10.0000000  1
2   0   3   16  0.00000000  0.00000000  0.00000000  0.00000000  -35.362991  149.165237  20.0000000  1
3   0   3   16  0.00000000  0.00000000  0.00000000  0.00000000  -35.362991  149.165507  20.0000000  1
4   0   3   16  0.00000000  0.00000000  0.00000000  0.00000000  -35.363261  149.165507  20.0000000  1
5   0   3   16  0.00000000  0.00000000  0.00000000  0.00000000  -35.363261  149.165237  20.0000000  1
6   0   3   21  0.00000000  0.00000000  0.00000000  0.00000000  0.00000000  0.00000000  0.0000000   1
Save and exit: Ctrl+X, then Y, then Enter
Understanding the Mission File
Line 0 (Home position):
- Index 0, Current=1 (home), Command 16 (waypoint)
- Lat/Lon: Default SITL location (Australia)
- Alt: 584m MSL (mean sea level)
Line 1 (Takeoff):
- Command 22 (TAKEOFF)
- Altitude: 10m (relative to home)
Lines 2-5 (Waypoints):
- Command 16 (WAYPOINT)
- Each corner of square
- Altitude: 20m (relative)
Line 6 (Return to Launch):
- Command 21 (RTL)
- Climbs to 15m (default RTL altitude)
- Returns to home and lands
Mission Execution Flow
Before executing, understand the state transitions:

Execute Mission in SITL
Video Demonstration
Watch the complete mission execution in SITL:
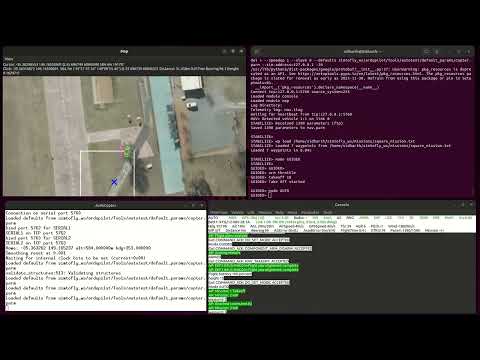
Complete autonomous square pattern mission with 2D map visualization
Launch SITL
Start SITL with map and console:
Note: We can run sim_vehicle.py from any directory because we added it to PATH in Section 1.3.
Wait for: STABILIZE> prompt and map window to open.
Load Mission File
At MAVProxy prompt:
Important: Replace YOUR_USERNAME with your actual username.
Full Absolute Path Required
MAVProxy does not expand
~or$HOMEvariables. You must use the complete path.
To find your username:
Expected output:

✅ Success: Mission loaded (7 items: home + 6 commands)
Note: MAVProxy requires full absolute path. Using ~ or $HOME will not work.
Verify Mission Loaded
Expected output:
0  HOME(-35.363261, 149.165237, 584.00)
1  TAKEOFF(0.000000, 0.000000, 10.00)
2  WAYPOINT(-35.362991, 149.165237, 20.00)
3  WAYPOINT(-35.362991, 149.165507, 20.00)
4  WAYPOINT(-35.363261, 149.165507, 20.00)
5  WAYPOINT(-35.363261, 149.165237, 20.00)
6  RTL(0.000000, 0.000000, 0.00)

✅ Success: All waypoints listed correctly
Map window: Should show waypoint markers connected by lines.
Execute Mission
Command sequence:
What happens:
- Switch to GUIDED mode
- Motors spin up (armed)
- Drone takes off to 10m
- Switch to AUTO mode
- Mission executes automatically:
- Climbs to 20m
- Flies to each waypoint in sequence
- Returns to start position (RTL)
- Descends and lands
- Automatically disarms
This takes: 2-3 minutes total.
Why GUIDED first? Starting in GUIDED mode and taking off manually before AUTO ensures all systems are working and provides smoother transition to autonomous flight.
Monitor Mission Progress
Watch console window: - Current waypoint number - Altitude climbing/descending - Distance to next waypoint
Watch map window: - Drone icon moving - Following waypoint path - Position updating in real-time
MAVProxy prompt shows:
✅ Success: Mission completes, drone lands and disarms
Execute Mission in Gazebo
Video Demonstration
Watch the mission with realistic 3D visualization:
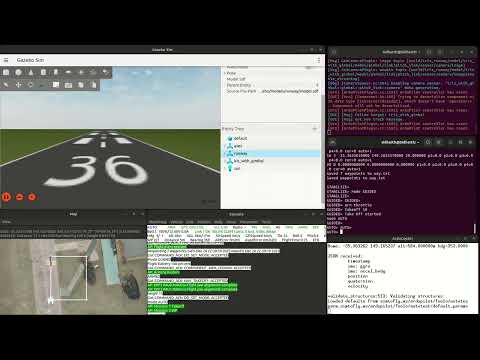
Same mission with Gazebo Harmonic 3D physics and visualization
Launch Gazebo
Terminal 1:
Wait for: Gazebo window and drone to load.
Launch SITL
Terminal 2:
Wait for: Connection established, STABILIZE> prompt.
Load and Execute Mission
In Terminal 2 (SITL prompt):
wp load /home/YOUR_USERNAME/simtofly_ws/missions/square_mission.txt
wp list
mode GUIDED
arm throttle
takeoff 10
mode AUTO
Watch in Gazebo:
- Propellers spin
- Drone lifts off
- Flies square pattern in 3D
- Returns and lands
- Realistic physics simulation
Much more impressive with 3D visualization!
✅ Success: Complete autonomous mission in Gazebo
Understanding Mission Behavior
Mission States
Pre-flight:
- Mission loaded but not executing
- Can review with
wp list - Can clear with
wp clear
During mission (AUTO mode):
- Executing waypoints sequentially
- Current waypoint shown in console
- Can pause:
mode LOITER(requiresrc 3 1500first) - Can resume:
mode AUTO(continues from next waypoint)
Mission complete:
- Returns to launch via RTL
- Lands at home position
- Automatically disarms
- Mode stays AUTO
RTL Behavior
When RTL command executes (waypoint 6 or manual mode RTL):
- Drone climbs to RTL altitude (15m default) if below
- Flies directly to home position
- Descends at controlled rate
- Lands at home
- Automatically disarms
RTL altitude parameter: RTL_ALT (default 1500 = 15 meters)
Useful for: Mission completion or emergency return
Pausing Mission Mid-Flight
To pause and hold position:
To resume mission:
Emergency abort:
Alternative Mission Execution Method
Advanced: Direct AUTO Mode
For experienced users, direct AUTO mode from ground:
wp load /home/YOUR_USERNAME/simtofly_ws/missions/square_mission.txt
mode LOITER
rc 3 1500
arm throttle
mode AUTO
This method:
- Uses mission's TAKEOFF command directly
- Requires throttle setting to prevent failsafe
- More complex but demonstrates proper AUTO mode usage
Beginners should use GUIDED method shown above.
Create Custom Mission
Using Your Location
Find your coordinates:
- Google Maps: Right-click location → Click coordinates to copy
- Format: Latitude, Longitude (e.g., 37.7749, -122.4194)
Mission Template
Create ~/simtofly_ws/missions/custom_mission.txt:
QGC WPL 110
0   1   0   16  0   0   0   0   YOUR_LAT    YOUR_LON    YOUR_ALT    1
1   0   3   22  0   0   0   0   0   0   10.0    1
2   0   3   16  0   0   0   0   WAYPOINT1_LAT   WAYPOINT1_LON   15.0    1
3   0   3   16  0   0   0   0   WAYPOINT2_LAT   WAYPOINT2_LON   15.0    1
4   0   3   21  0   0   0   0   0   0   0   1
Replace:
YOUR_LAT,YOUR_LON— Your home positionYOUR_ALT— Your altitude MSL (check Google Earth)WAYPOINT1_LAT,WAYPOINT1_LON— First waypointWAYPOINT2_LAT,WAYPOINT2_LON— Second waypoint
Coordinate Math (Approximate)
At equator (rough estimates):
- 1° latitude ≈ 111 km
- 1° longitude ≈ 111 km
For small distances:
- 0.0001° ≈ 11 meters
- 0.001° ≈ 111 meters
Example: Move 50m North from start:
Better tool: Use mission planner software or online calculators.
Analyzing Flight Logs
Where Logs Are Saved
SITL saves logs automatically:
Expected output:
Latest log: Highest number.
Advanced: Log Analysis (Optional)
Online tool (Recommended for beginners):
Upload logs to: https://plot.ardupilot.org/
Features:
- No installation needed
- Visual graphs of flight data
- Analyze altitude, speed, position
- Compare multiple flights
- Share analysis with others
To upload:
- Find latest
.BINfile in logs directory - Go to https://plot.ardupilot.org/
- Upload the file
- Explore interactive graphs
Command-Line Log Viewing
View log summary:
Extract mission data:
Extract mode changes:
Extract GPS positions:
Mission Best Practices
Safety Guidelines
Always:
- Test missions in SITL before real hardware
- Include takeoff command as first action
- Include RTL or LAND as last command
- Keep waypoints within safe distance
- Check altitude limits (not too high)
Never:
- Skip home position (line 0)
- Use absolute altitude without understanding MSL
- Create waypoints too close together (minimum ~5m)
- Forget autocontinue flag (missions won't progress)
Mission Design Tips
Start simple:
- 3-5 waypoints maximum
- Single altitude throughout
- Familiar area
Progress to complex:
- Multiple altitudes
- Actions at waypoints (delay, change speed)
- Survey patterns (grid, spiral)
Test incrementally:
- Fly each waypoint manually first
- Then convert to mission
- Test in SITL
- Finally test on real hardware (Phase 4)
Verification Checklist
Before moving to Phase 2, verify you can:
- Launch SITL from any directory (PATH set)
- Create mission file with correct format
- Load mission using full path
- Verify mission with
wp list - Execute mission in SITL (GUIDED → AUTO)
- Execute mission in Gazebo with 3D visualization
- Monitor mission progress via map and console
- Understand RTL behavior
- Pause and resume mission if needed
- Find and view flight logs
- Create custom mission files
All checked? Congratulations! Phase 1 complete!
What You Accomplished in Phase 1
Simulation Environment:
- ✅ Set up complete Ubuntu development environment
- ✅ Installed ArduPilot SITL simulator
- ✅ Configured Gazebo Harmonic 3D simulation
- ✅ Built ArduPilot Gazebo plugin from source
Drone Control:
- ✅ Mastered MAVProxy command-line control
- ✅ Understood flight modes and their purposes
- ✅ Performed manual flights (arm, takeoff, navigate, land)
- ✅ Monitored telemetry data in real-time
Autonomous Flight:
- ✅ Created waypoint mission files
- ✅ Loaded and executed autonomous missions
- ✅ Completed full square pattern mission in SITL and Gazebo
- ✅ Analyzed flight logs
Foundation Built:
- ✅ Safe testing environment (no hardware risk)
- ✅ Understanding of ArduPilot fundamentals
- ✅ Ready for ROS2 integration (Phase 2)
What's Next: Phase 2 - ROS2 Integration
Coming in Phase 2:
- Install ROS2 Humble
- Setup MAVROS (MAVLink ↔ ROS2 bridge)
- Create ROS2 nodes for drone control
- Subscribe to telemetry topics
- Publish control commands
- Execute missions via ROS2
- Visualize data in RViz
Why ROS2?
- More flexible than MAVProxy
- Industry-standard robotics framework
- Integrate sensors (cameras, lidar)
- Advanced autonomy algorithms
- Multi-robot systems
Common Questions
Q: Can I create missions with a GUI instead of text files?
A: Yes! Use these tools:
- Mission Planner (Windows, most popular)
- QGroundControl (Cross-platform)
- APM Planner 2 (Cross-platform)
They all export to same .txt format we use here.
Q: What's the maximum mission size?
A: ArduPilot supports up to 700+ waypoints, but practical limits:
- SITL: Unlimited (memory constrained)
- Real hardware: ~100-200 waypoints typical
- Depends on flight controller memory
Q: Why use GUIDED takeoff before AUTO mode?
A: Starting in GUIDED mode provides:
- Visual confirmation systems are working
- Smoother transition to AUTO mode
- Better for beginners learning the workflow
- Advanced users can use direct AUTO mode
Q: Why does my mission skip waypoints?
Possible causes:
- Autocontinue flag = 0 (should be 1)
- Waypoint acceptance radius too large
- Mission file syntax error
Check: wp list shows all waypoints correctly.
Q: How do I add camera trigger at waypoint?
A: Use DO_SET_CAM_TRIGG_DIST command (ID 206):
Triggers camera every 10 meters.More on this: ArduPilot camera trigger documentation.
Q: What's the difference between LAND and RTL?
A:
- LAND (20): Lands at current position immediately
- RTL (21): Returns to home position, then lands
- RTL climbs to 15m before returning (safety feature)
Troubleshooting
Mission won't load - "Failed to load waypoints"
Cause: File format error or path issue
Solution:
- Use full absolute path (not
~or$HOME) - Check header line:
QGC WPL 110(exact text) - Verify 12 columns per line (tab or space separated)
- No extra blank lines
- Home position (line 0) has Current=1
Mission loads but drone doesn't move
Cause: Not in AUTO mode or not armed properly
Solution:
In this exact order.Drone flies to wrong location
Cause: Incorrect coordinates in mission file
Solution:
- Verify latitude/longitude are in decimal degrees (not DMS)
- Check sign (negative for South/West)
- Verify altitude is relative (Frame=3), not absolute
Mission starts but immediately disarms
Cause: Throttle failsafe or starting directly in AUTO
Solution: Use GUIDED takeoff method:
Drone hovers at waypoint and doesn't continue
Cause: Autocontinue flag = 0
Solution:
- Last column of each line should be 1
- Change 0 to 1 in mission file
- Reload mission
"No GPS lock" in SITL
Cause: Rare in SITL, GPS initializes instantly
Solution:
- Wait 5 seconds after SITL launch
- Check console shows GPS: 3D Fix
- Restart SITL if issue persists
Cannot load mission file - "No such file or directory"
Cause: MAVProxy doesn't expand ~ or $HOME
Solution: Use full absolute path:
Find your username with: echo $USER
Additional Resources
ArduPilot Documentation:
- Mission Commands: https://ardupilot.org/copter/docs/common-mavlink-mission-command-messages-mav_cmd.html
- Mission Planning: https://ardupilot.org/copter/docs/common-mission-planning.html
- AUTO Mode: https://ardupilot.org/copter/docs/auto-mode.html
MAVLink Protocol:
- Command Reference: https://mavlink.io/en/messages/common.html
- Mission Protocol: https://mavlink.io/en/services/mission.html
Tools:
- QGroundControl: http://qgroundcontrol.com/
- Mission Planner: https://ardupilot.org/planner/
- MAVProxy Documentation: https://ardupilot.org/mavproxy/
- Log Analysis: https://plot.ardupilot.org/
Congratulations on Completing Phase 1!
You've built a solid foundation in drone simulation and autonomous flight. You now understand:
- ArduPilot SITL simulator
- Gazebo 3D visualization
- MAVProxy control
- Waypoint missions
- Autonomous flight execution
You're ready for Phase 2: ROS2 Integration
Take a break, review what you've learned, and when ready, continue your journey!
Share Your Success
Completed Phase 1? We'd love to hear about it!
- Star the repository: https://github.com/simtofly/simtofly-guide
- Share your experience in Discussions
- Help others in Issues section
- Tweet with #SimToFly
Your feedback helps improve this tutorial for everyone!
← Back: 1.5 Gazebo Simulation | Next: Phase 2 Overview →
Phase 1 Complete!
You've mastered simulation. Now let's integrate ROS2.
Continue to Phase 2 →