1.4 MAVProxy Command Line Control
What You'll Learn
Master basic drone control through MAVProxy command line:
- What MAVProxy is and why we use it
- Launch SITL with map and console
- Understand flight modes
- Arm and disarm the vehicle
- Perform takeoff and landing
- Basic navigation using map
- Monitor telemetry data
Time: 60-90 minutes
Prerequisites
Before starting, you must have completed:
- ✅ 1.1 Prerequisites and Setup
- ✅ 1.2 Environment Setup
- ✅ 1.3 ArduPilot SITL Installation
- ✅ SITL launches successfully
- ✅ Can arm/disarm vehicle
What is MAVProxy?
MAVProxy = MAVLink Proxy and Command Shell
It's a command-line ground control station that lets you:
- Control drone through typed commands
- Monitor telemetry in real-time
- Load and execute missions
- Visualize drone position on map
Why MAVProxy?
- Lightweight and fast
- Perfect for learning fundamentals
- Scriptable and automatable
- Works over SSH (no GUI needed)
Later we'll use: ROS2 for advanced control, but MAVProxy teaches the basics.
What is MAVLink?
MAVLink (Micro Air Vehicle Link) is the communication protocol that allows ground control stations to talk to drones.
Think of it as the language spoken between your computer and the flight controller:
| Component | Role |
|---|---|
| MAVLink | The language/protocol (defines message formats) |
| MAVProxy | The translator (sends/receives MAVLink messages) |
| SITL | The drone brain (understands MAVLink commands) |
What MAVLink handles:
- Telemetry: GPS position, altitude, battery, attitude
- Commands: Arm, disarm, takeoff, land, mode changes
- Missions: Upload/download waypoint files
- Parameters: Read/write flight controller settings
In this tutorial:
You won't write MAVLink messages directly. MAVProxy handles that for you. When you type arm throttle, MAVProxy converts it to the appropriate MAVLink message and sends it to SITL.
Later in Phase 2: MAVROS will bridge MAVLink to ROS2, letting you control drones programmatically with Python/C++.
Reference: Full MAVLink specification at mavlink.io
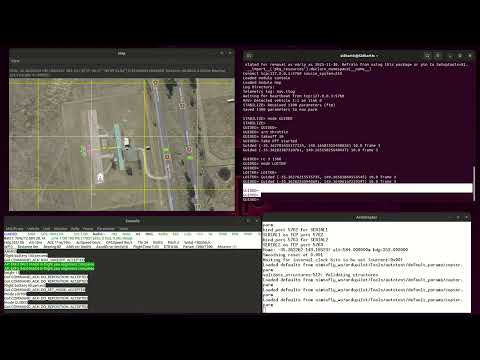
Launch SITL with Map and Console
Basic SITL Launch with Visualization
Instead of just text output, let's open map and console windows:
Note: We can run sim_vehicle.py from any directory because we added it to PATH in Section 1.3.
Command breakdown:
- -v ArduCopter — Vehicle type (multirotor)
- --map — Opens map window
- --console — Opens console window
This takes: 10-20 seconds to launch all windows.
Expected Windows
Four windows will open:
| Window | Name | Purpose |
|---|---|---|
| Top-Left | MAVProxy 2D Map | Shows drone position on satellite/terrain map with grid overlay |
| Top-Right | SITL Main Terminal | Command input (MAVProxy prompt), system messages |
| Bottom-Left | MAVProxy Console | Real-time telemetry (GPS, altitude, speed, battery, flight mode) |
| Bottom-Right | ArduCopter Console | ArduCopter initialization messages and system logs |

✅ Success: All four windows open, see STABILIZE> prompt in main terminal
Understanding the Windows
SITL Main Terminal (Top-Right):
- Purpose: Enter commands here - Shows: MAVProxy prompt, system messages, command responsesMAVProxy 2D Map (Top-Left): - Drone icon: Green marker showing position - Heading: Arrow indicates drone orientation - Controls: Zoom (mouse wheel), pan (drag), right-click for commands
MAVProxy Console (Bottom-Left): - Real-time data displayed: - Mode, Armed status - Altitude, Speed - GPS status, Satellite count - Battery voltage, percentage - Heading, Attitude
ArduCopter Console (Bottom-Right): - Shows: System initialization, parameter loading, validation messages - Use: Monitor for errors or warnings during startup
Can't See Windows? (Headless/SSH Users)
If you're on SSH without display:
Skip map/console — Control via terminal only (works fine for learning).
Understanding Flight Modes
ArduCopter has different modes for different purposes:
Common Flight Modes
| Mode | Purpose | When to Use |
|---|---|---|
| STABILIZE | Manual control, self-levels | Default mode, manual flying |
| GUIDED | Computer control via commands | Autonomous commands (takeoff, land) |
| AUTO | Follow pre-planned mission | Execute waypoint missions |
| LOITER | Hold position using GPS | Pause and hover in place |
| CIRCLE | Fly in circular pattern | Practice autonomous flight |
| RTL | Return to launch point | Emergency return home |
| LAND | Descend and land | Controlled landing |
For this tutorial, we'll use:
GUIDED— For takeoff and landingLOITER— Hold positionCIRCLE— Fly in circlesRTL— Return home
For a complete comparison of flight modes:

Check Current Mode
At MAVProxy prompt:
Expected output:

Change Mode
Expected output:

Notice the prompt changes to show current mode.
✅ Success: Mode changed, prompt shows GUIDED>
Arming and Takeoff
Pre-Arm Checks
Before arming, ArduPilot performs safety checks:
- GPS lock (SITL has instant GPS)
- Battery sufficient
- No critical errors
In SITL, these pass automatically.
Arm the Vehicle
Switch to GUIDED mode first:
Then arm:
Expected output:

Console window: Shows "ARMED" status
What happens:
- Motors would spin up (if real drone)
- Vehicle ready to fly
- LEDs change (on real hardware)
✅ Success: Status shows ARMED
Important: 30-Second Rule
After arming, you have 30 seconds to takeoff.
If you don't send takeoff command within 30 seconds:
- Vehicle automatically disarms (safety feature)
- You'll see:
DISARMED
This prevents: Leaving motors armed indefinitely.
Takeoff Command
Immediately after arming:
Command breakdown:
takeoff— Takeoff command10— Target altitude in meters
Expected behavior:
- Drone climbs to 10 meters
- Console shows altitude increasing
- Map shows altitude number changing
This takes: 10-20 seconds to reach altitude.
Watch console window: Altitude (Alt) climbs to ~10m

✅ Success: Altitude reaches 10 meters, drone hovers
Basic Navigation
Navigate Using Map (Easiest Method)
After takeoff, the easiest way to move the drone:
- Right-click on the map where you want drone to go
- Select "Fly to here" from the menu
- Drone automatically flies to that position and holds
Practice:
- Click different locations on the map
- Watch drone move in real-time
- Observe drone icon following your commands
- Map updates position continuously

✅ This is the recommended way for beginners!
Hold Position (LOITER Mode)
To pause and hover in place:
What happens:
- Drone holds current GPS position
- Maintains altitude (with rc 3 1500)
- No drift (GPS position lock)
Use this to:
- Pause during flight
- Hold position while you plan next move
- Emergency "stop and hover"
Note: The rc 3 1500 command sets throttle to maintain altitude in LOITER mode.
Practice: Fly in Circles
Make drone fly in circular pattern:
mode GUIDED
arm throttle
takeoff 15

# Set throttle to maintain altitude
rc 3 1500

# Switch to CIRCLE mode
mode CIRCLE
What happens:
- Drone flies in circles around current center point
- Radius: 10 meters (default)
- Maintains 15m altitude (thanks to rc 3 1500)
- Direction: Clockwise
Watch the map: Drone traces circular path
Return home:
Note: The rc 3 1500 command is necessary to maintain altitude in CIRCLE and LOITER modes. Without it, drone will lose altitude.
Landing
Land Command
When ready to land:
What happens:
- Drone descends at controlled rate
- Automatically disarms when on ground
- Mode changes to LAND
This takes: 10-30 seconds depending on altitude.
Console window: Watch altitude decrease to 0
✅ Success: Altitude reaches 0, status shows DISARMED
Alternative: RTL (Return to Launch)
Return and land at start position:
What happens:
- Drone flies back to start position
- Climbs to RTL altitude (15m default)
- Descends and lands at home
Useful for: Emergency return or end of mission.
Understanding Coordinate Frames
ArduPilot uses the NED (North-East-Down) coordinate system for navigation and telemetry:

| Axis | Direction | Positive Value |
|---|---|---|
| X | North | Moving northward |
| Y | East | Moving eastward |
| Z | Down | Moving toward ground |
Why this matters:
When you see telemetry data, altitude appears as a negative Z value. This is normal behavior, not an error.
| Real-world position | NED representation |
|---|---|
| 10m above ground | Z = -10 |
| 50m North of home | X = +50 |
| 30m East of home | Y = +30 |
Example telemetry reading:
This means: 50m North, 30m East, 15m altitude above home.Note: Some robotics systems use ENU (East-North-Up) where Z is positive upward. ArduPilot uses NED, so always remember: negative Z = altitude gain.
Reading Telemetry
Console Window Data
Key information displayed:
What each means:
- Mode — Current flight mode
- Armed — Motors armed/disarmed
- Alt — Altitude above ground
- Spd — Ground speed
- Hdg — Heading (0° = North)
- GPS — GPS status and satellite count
- Bat — Battery voltage and percentage
MAVProxy Status Commands
Get GPS position:
Get attitude (roll, pitch, yaw):
Get battery status:
Complete Flight Example
Video Demonstration
Watch the complete flight sequence in action:
Step-by-Step Flight
# 1. Start SITL with map
sim_vehicle.py -v ArduCopter --map --console

# 2. Change to GUIDED mode
mode GUIDED

# 3. Arm the vehicle
arm throttle

# 4. Takeoff to 10 meters
takeoff 10

# Wait for altitude to reach 10m (watch console)

# 5. Navigate using map
# Right-click on map and select "Fly to here"
# Watch drone move to selected position

# 6. Try LOITER mode
rc 3 1500
mode LOITER

# 7. Try CIRCLE mode
mode CIRCLE

# Watch drone fly in circles

# 8. Return to launch
mode RTL

# Wait for drone to return and land

# 9. Exit SITL
Ctrl+C
Complete this sequence to verify everything works.
✅ Success: Drone completes full flight, lands safely
🌍 Custom Location (Optional)
Why Change Location?
Default SITL location is in Australia. You can set your own location.
Add Custom Location
Create location entry:
echo "custom=YOUR_LAT,YOUR_LONG,ALT,HEADING" >> ~/simtofly_ws/ardupilot/Tools/autotest/locations.txt
Example (replace with your coordinates):
Format:
- Name = your location identifier
- LAT = latitude (decimal degrees)
- LONG = longitude (decimal degrees)
- ALT = altitude MSL (meters)
- HEADING = initial heading (0 = North)
Launch at Custom Location
Replace myfield with your location name.
Map window: Shows your custom location.
Verification Checklist
Before moving to next section, verify:
- Can launch SITL with
--map --console - Map and console windows open
- Can change flight modes (GUIDED, LOITER, CIRCLE)
- Can arm vehicle (
arm throttle) - Can takeoff to specific altitude
- Can navigate using map "Fly to here"
- Can use LOITER to hold position
- Can use CIRCLE to fly in circles
- Can land safely with RTL or land command
- Understand telemetry data in console
- Completed full flight sequence
All checked? You can control a simulated drone!
What You Accomplished
- ✅ Launched SITL with visualization (map + console)
- ✅ Understood different flight modes
- ✅ Armed and disarmed vehicle
- ✅ Performed takeoff to target altitude
- ✅ Navigated drone using map interface
- ✅ Used LOITER mode to hold position
- ✅ Used CIRCLE mode for autonomous flight
- ✅ Landed safely using RTL
- ✅ Read and understood telemetry data
- ✅ Completed full autonomous flight sequence
Next Steps
Continue to 1.5 Gazebo Simulation where we'll:
- Install Gazebo Harmonic 3D simulator
- Connect Gazebo to SITL
- See realistic drone physics
- Visualize sensors and environment
Common Questions
Q: Why use GUIDED mode instead of STABILIZE?
A:
- GUIDED — Accepts autonomous commands (takeoff, land)
- STABILIZE — Manual RC control only (no autonomous commands)
For autonomous missions, always use GUIDED or AUTO.
Q: What if I forget to takeoff within 30 seconds?
A: Vehicle disarms automatically. Just arm again and send takeoff command.
Q: Can I control multiple drones in SITL?
A: Yes! Use multiple SITL instances on different ports. We'll cover this in advanced topics.
Q: How do I make drone hold position?
A: Use one of these modes:
- LOITER with
rc 3 1500— Holds current GPS position - Map "Fly to here" in GUIDED mode — Holds at clicked position
- STABILIZE won't hold position (manual control only)
Q: Why do CIRCLE and LOITER need rc 3 1500?
A: These modes need throttle input to maintain altitude. Without it, the drone will lose altitude. The rc 3 1500 command sets throttle to middle position (hover).
Q: How do I stop a command mid-flight?
A: Send a new command (overrides previous) or change mode:
Troubleshooting
Map window doesn't open
Cause: Missing Python packages
Solution:
Relaunch SITL.
"Bad mode" error when changing modes
Cause: Mode name typo
Solution: Mode names are case-sensitive. Use:
GUIDED(not "guided")STABILIZE(not "stabilize")LOITER(not "loiter")
Arm command rejected "PreArm: Need 3D Fix"
Cause: GPS not initialized (rare in SITL)
Solution: Wait 5-10 seconds, try arming again. SITL gets instant GPS fix.
Console shows negative altitude
Cause: Normal! NED frame uses negative Z for up.
Solution: Nothing to fix. Just remember:
- Altitude 10m = Z of -10
- Ground level = Z of 0
Takeoff command does nothing
Cause:
- Not armed
- Not in GUIDED mode
- Already in air
Solution:
In this exact order.
Drone loses altitude in CIRCLE or LOITER mode
Cause: Missing rc 3 1500 command
Solution:
Then switch to CIRCLE or LOITER mode.
"Failed to change mode" message
Cause: Some modes require certain conditions (e.g., GPS lock for LOITER)
Solution: Check console for reason, or use STABILIZE/GUIDED (always available).